If you want a completely free face swap video tool, FaceFusion is a great pick. I have no coding skills, so I Googled “FaceFusion” and found FaceFusion.co and RunDiffusion, both of which say you can utilize FaceFusion for free online. But finally, I found out that this is a scam. So I decided to install and use the FaceFusion software.
Why Don’t I Recommend Online FaceFusion Websites?
Yes, I cannot recommend the online FaceFusion websites. FaceFusion.co and RunDiffusion are great instances to illustrate this. FaceFusion.co does not use FaceFusion; when you complete your free trial (1 photo face swap per day), you will be moved to another face swap website.

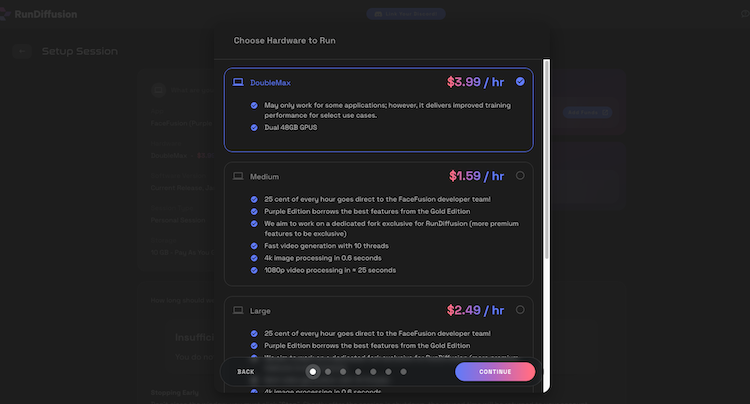
And what about RunDiffusion? RunDiffusion performs better. When you sign up, you will receive about 10 photo face swaps every day; however, this does not support video face swaps. If you wish to use FaceFusion, you must pay for and purchase a GPU to run and train your model.
What Are the Minimum Computer Requirements for Installing FaceFusion AI?
According to FaceFusion’s official documentation, 8GB is the basic minimum; anything up to 12GB should function perfectly. I also discovered a great response from a Reddit user:
“Technically, there isn’t a minimum computer requirement for FaceFusion. The main thing that would hold anybody back is whether the computer is too old (including operating system) to run some of the underlying software, such as new enough versions of Python, etc.
If the software can technically be run, then it’s just a question of speed. You can run it off of only the CPU, which will be very slow. There are separate models made for whatever kind of GPU you have (AMD, Nvidia, Intel, Apple Silicon). All at varying speeds. The top would currently be an Nvidia 4090. And the more vram, always the better.”

In general, FaceFusion may be installed on any computer, but the GPU can affect the actual running and generating performance.
How to Install FaceFusion AI with 0 Coding Skills?
Method 1: Purchase FaceFusion Installer
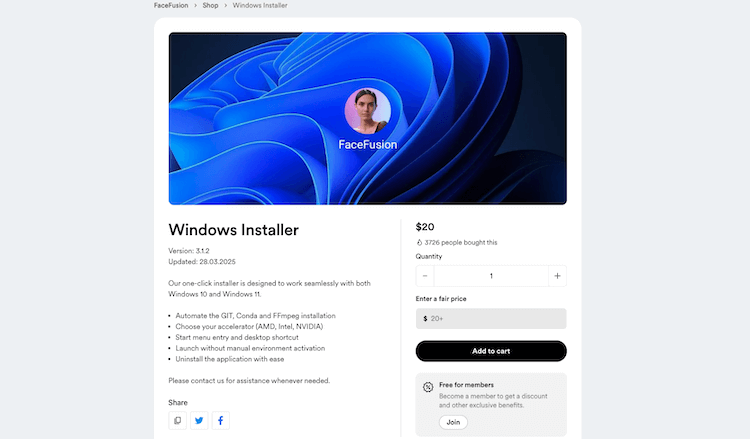
Yes, FaceFusion offers a one-click installer for Windows and MacOS. However, you must pay $20 for the Windows installer and $30 for the MacOS installer, after which everything will be simple, and you can enjoy:
- Automate the GIT, Conda and FFmpeg installation
- Start menu entry and desktop shortcut
- Launch without manual environment activation
- Uninstall the application with ease
Method 2: Using third-party installation software (Pinokio)
Pinokio is a browser that allows you to install, run, and manage free open source software locally. You can use it to install FaceFusion, Hunyuanvideo, Comfyui, Wan 2.1 and more.

Step 1: Download Pinokio
There is a full guidance on the Pinokio website that will help you use Pinokio. For Mac, there are two versions; you must check your chip to determine whether to download for Apple Silicone Mac (M1/M2/M3/M4) or Intel Mac.
Step 2: Install Pinokio
Pinokio may be easily installed on Windows. For Mac, it is a little more difficult, however there is a helpful demo video describing how to install Pinokio on Mac. Furthermore, if you are still unable to install Pinokio after following the demo video, and your Mac machine displays a message saying “damaged and cannot be opened. You should move it to the Trash,” you can do the following steps:
- Setting > Privacy and Security: Turn on the option to allow apps downloaded from any source. If you don’t find this option, open Terminal and execute the following command: `sudo spctl –master-disable`. Then, check Privacy and Security to allow apps from any source.
- Terminal: Input `xattr -cr ` (there is a space after `cr`), then drag the Pinokio program icon to the space after `cr`, and finally press enter.
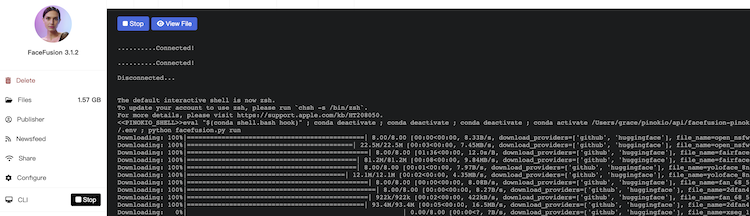
Step 3: Download FaceFusion AI
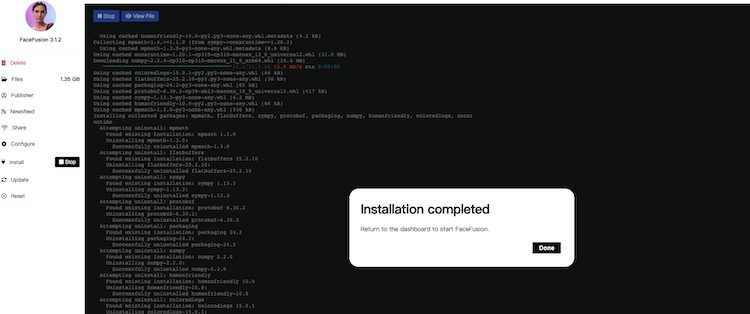
Then open Pinokio and search for “FaceFusion” to find and download it. FaceFusion installation requirements include conda, git, zip, node, ffmpeg, brew, python, cloudflared, playwright, huggingface, and uv. You will have to wait a long time after clicking “download” because numerous things must be installed, so please be patient.

When you see the “installation completed” pop-up, you’ve successfully downloaded and installed it.
How to Use FaceFusion AI for Face Swapping Free?
Congratulations, you have successfully downloaded and installed FaceFusion AI. Now, click “Run Default” to get running on the local URL, as seen in the image below. Then simply copy and paste it into your browser to access it.
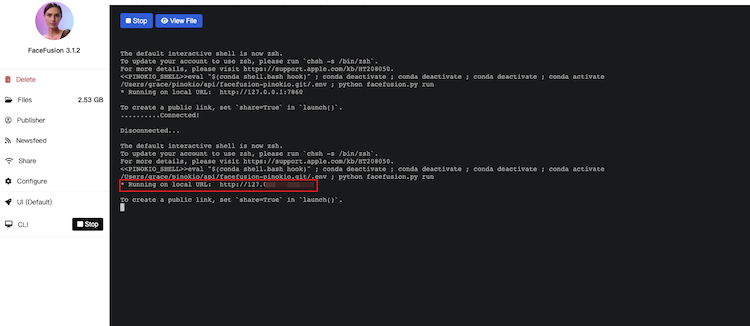
Step 1: Running on Local URL
You can open the local URL. Then you will visit a page like the following image show.
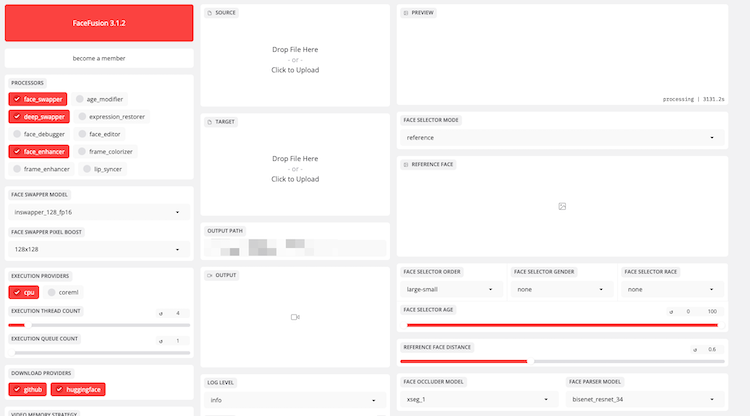
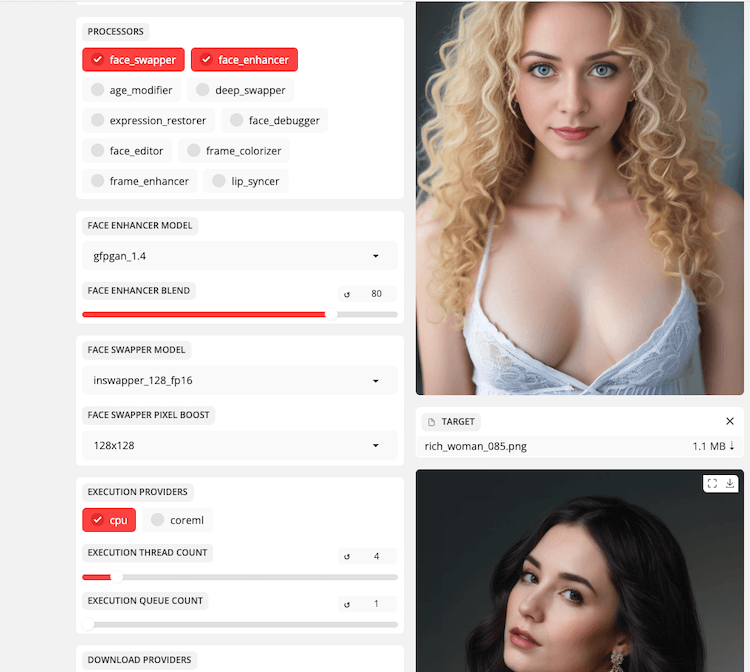
Step 2: FaceFusion Settings
Compared with online face swap websites or apps, FaceFusion does have more complex options. I’ll go over each one individually.
Recommend Settings: Choose face_swapper and face_enhancer, and leave the other settings as they are. The following sections provide detailed information for each setting. It was extremely long and boring. If you’re interested, you can read on; otherwise, skip this section.
PROCESSORS
You can read this document to learn more specific details about processors. Here are simple explanations:
| Task | Suggested Processors |
| Basic face swap | face_swapper |
| High-quality face blending | face_swapper, deep_swapper |
| Aging a face | face_swapper, age_modifier |
| Making mouth match speech | face_swapper, lip_syncer |
| Enhancing blurry results | face_enhancer, frame_enhancer |
| Editing facial structure | face_editor |
| Colorizing black & white video | frame_colorizer |
You can select the right processors for FaceFusion based on your unique requirements. I typically select face_swapper and face_enhancer. I’ll use deep_swapper when I want a more natural fusion effect for face swapping.
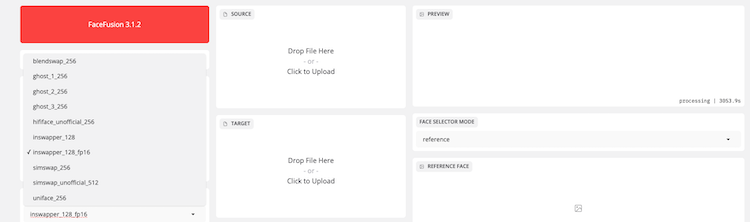
Face Swapper Model
There are several face swapper models, and the default model is inswapper_128_fp16, which is sufficient for the majority of face swapping cases. If you don’t like the model face swap result, you can select another.
FACE SWAPPER PIXEL BOOST
128 x 128 is the default option. The Face Swapper Pixel Boost value isn’t always better when larger—it depends on your input file resolution, hardware, and needs. The default 128×128 is a safe choice for most scenarios (e.g., 720p or 1080p videos). If you require greater clarity (for example, 4K videos), try 256×256, but be sure your hardware can support it (GPU recommended).
Execution Providers
Purpose: Determines which hardware is used for AI processing tasks.
CPU: Uses the computer’s CPU (Central Processing Unit) for computation, suitable for most standard computers but slower.
coreml: Uses Apple’s CoreML framework (for Mac or iOS devices), leveraging Apple hardware acceleration.
Execution Thread Count
Recommend Value: 4
Purpose: Specifies how many threads the CPU utilizes to process tasks. More threads enable the CPU to do more jobs at once, potentially speeding up processing.
Note: The thread count should correspond to your CPU’s core count. Modern CPUs often contain 4-16 cores, thus 4 is a good default. Setting it too high could overload your system.
Execution Queue Count
Recommend Value: 1
Purpose: Specifies how many task queues are processed at the same time. A greater number allows more tasks to be executed in parallel while increasing hardware burden.1 means that just one task is being processed at a time, which is suitable for users with inferior hardware ability.
Download Providers
Purpose: Determines where FaceFusion will download required models or resources.
Video Memory Strategy
Purpose: Determines how GPU video memory (VRAM) is managed.
Options:
- strict: Strictly limits VRAM usage, ideal for GPUs with low memory.
- moderate: Balances performance and stability with moderate VRAM usage.
- high: Maximizes VRAM usage, suitable for high-performance GPUs.
System Memory Limit
Recommend Value: 4
Purpose: Limits the amount of system memory (RAM) that FaceFusion uses in GB.
A number of 0 indicates that there is no limit, which means that the software will use all available memory.
If your computer has restricted RAM (e.g., 8GB), establish a restriction (e.g., 4GB) to prevent system slowdowns.
Source
This is where you’ll upload the “source file,” which contains the face to be extracted (such as a photo or video). During face swapping, FaceFusion gets facial features from the source file and replaces them in the target file.
Target
This is where you upload the “target file,” which contains the face that will be swapped. FaceFusion replaces the face in the target file with that of the source file.
Output Path
Specifies where the processed file (the face swapped result) will be saved.
Output (Preview)
Used to preview the face swapped result. Once processing is complete, the swapped photo or video will appear here.
Log Level
Determines the level of detail in the logs generated by the software. Info is a standard level for logging basic information. Other options include error, warning, and debug.
Terminal
Show log Information.
UI Workflow
The UI Workflow settings control how FaceFusion executes tasks: instant_runner for speedy single tasks, job_runner for batch processing, and job_manager for extensive task management.
Preview
The preview box allows you to preview the face swap result before processing.
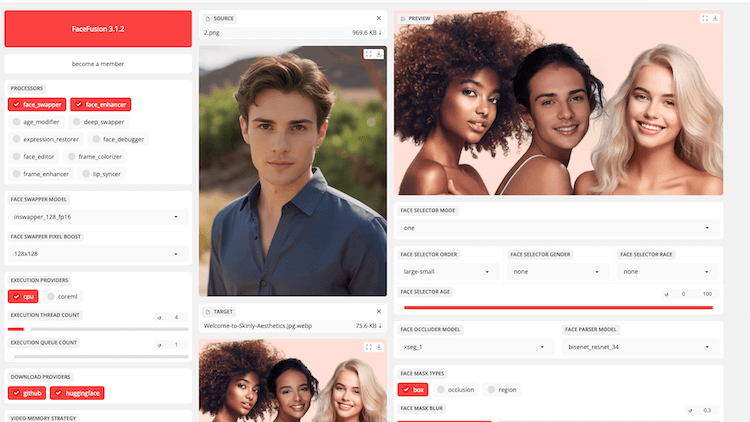
Face Selector Mode
Determines how FaceFusion chooses which face(s) in the target file to exchange. The options are: one, many, and reference. If your source and target just have one face, any mode is acceptable. If there are many faces, you should select the one that best meets your needs.
1) One: only exchange one face, based on the face selection order. For example, if I select large-small mode and the second face is larger, it will use that face.
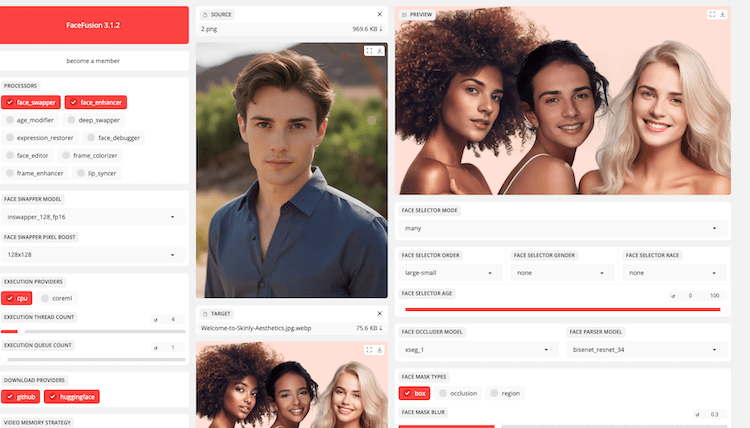
2) Many: swap all of the faces as seen in the image below.
3) Reference: You can select which face to use. (Recommend)
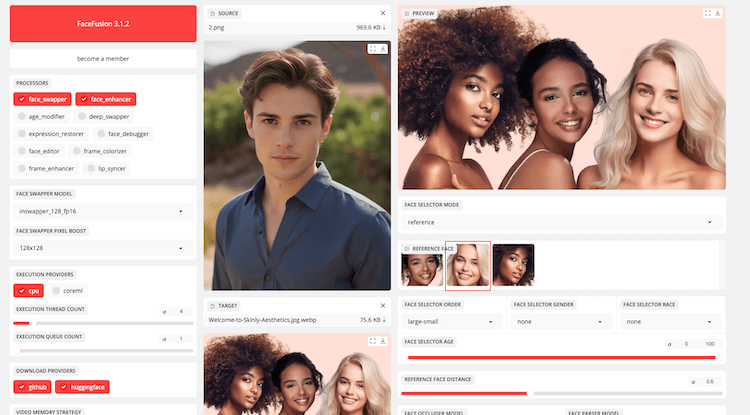
Face Selector Order
When the target file contains multiple faces, this specifies the order in which they are chosen. Options Include large-small, left-right, best-worst, and so on. (Recommend large-small)
Face Selector Gender
Faces are filtered by gender to assist AI better identify the target face. Include none, both male and female. (Recommend none)
Face Selector Race
Filters faces based on racial traits to increase the AI’s accuracy in identifying the target face. Include none, white, black, Latino, Asian, Indian, and Arabic. (Recommend none)
Face Selector Age
Faces are filtered by age range to help the AI recognize target faces inside a specified age group. There is no age restriction; the AI attempts to detect faces of all ages.
Reference Face Distance
In reference mode, this determines the similarity between the reference and target faces.
The value is between 0 and 1; a lower value indicates that the AI is less strict about similarity (easier to match), whereas a higher value indicates that the AI is stricter (only matches very similar faces).
0.6 is a balanced value that allows matches for similar faces while not being overly lenient. Furthermore, 0.6 is suitable for the majority of scenarios.
Tips: If the AI cannot match the face, lower the value (e.g., 0.4); if it matches the incorrect face, increase the value (e.g., 0.8).
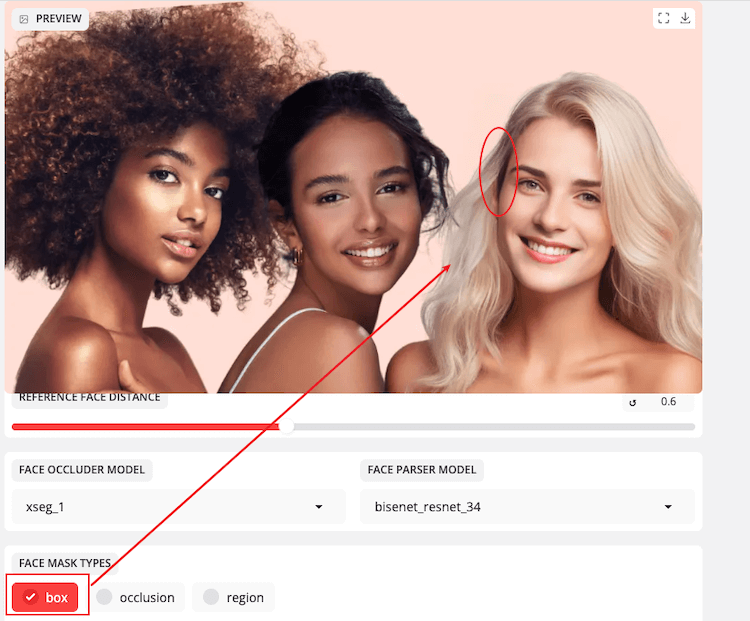
Face Occluder Model
Chooses the model for detecting facial occlusions (such as hair and hats). This model assists the AI in recognizing the face from the surrounding objects during face swapping.
xseg_1 is a default, pretrained model that is suitable for the majority of scenarios. It works well unless there are complex occlusions (e.g., heavy obstructions), in which case you should consider alternative models.
Face Parser Model
Chooses the model to parse facial regions (e.g., eyes, nose, mouth). This allows the AI to align and blend facial features while face swapping.
bisenet_resnet_34 is the default and most efficient model for face swapping tasks. The default model is usually sufficient. If the swap quality is poor, try another model.
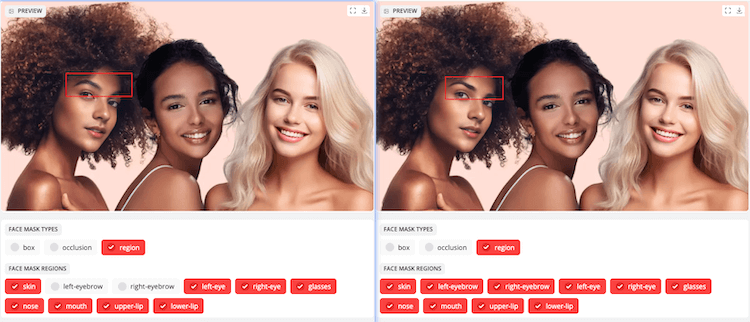
Face Mask Types
Determines the type of mask used during face swapping, controlling the coverage area:
1) Box: A rectangular box is used to cover the entire face (including the forehead and chin). Ideal for swaps that require a larger blending area. This is suitable for most face-swapping tasks.
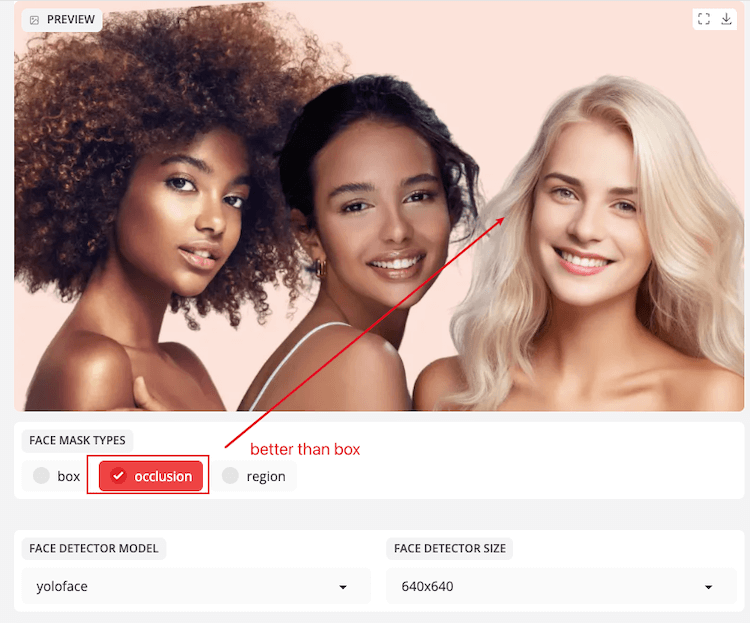
2) Occlusion: Based on occlusion detection, only the core area of the face is covered (for example, hair is not included), which is suitable for scenes that require accurate fusion. (Better than box)
3) Region: Based on face parsing, covers specific facial regions (for example, the eyes, eyebrow and nose). Ideal for fine-tuning adjustments.
Face Mask Blur
Controls the blur level at the mask’s edges, which ranges from 0 to one. A higher value blurs the mask edges, creating a more natural blend with the background.
0.3 is a moderate value that provides a natural blend without excessive blurring.
Tips: If the edges are too harsh after swapping, increase to 0.5; if they are too blurry, decrease to 0.1.
Face Mask Padding
Adjusts the padding (in pixels) around the mask to increase its coverage area.
For example, setting Top to 10 causes the mask to extend 10 pixels upward, covering more of the forehead.
Default set to 0, indicating that the mask fits tightly around the face edges with no extension.
Tips: If the face edges appear unnatural after swapping (for example, poor forehead or chin blending), increase padding by 5-10 pixels.
Face Detector Model
Chooses a model for detecting faces in the file and determining their positions. Yoloface is an efficient detection model that can handle most scenarios.
Tips: The default model, yoloface, works well. If face detection fails (for example, side profiles are not recognized), try different models.
Face Detector Size
Decides the resolution at which images are processed for face detection. 640×640 indicates that the image is scaled to 640×640 pixels for detection. Larger sizes may improve accuracy while increasing computation.
Tips: Most of the time, the default is sufficient. Reduce to 320×320 if hardware is limited; increase to 1280×1280 for greater precision.
Face Detector Angles
Determines the angles at which faces are detected. Include 0, 90, 180, and 270.
0 indicates that only normal (unrotated) faces are detected. Rotated faces can be detected by checking 90, 180, and 270 degrees (for example, in rotated phone videos).
Face Detector Score
Sets the confidence threshold for face detection, which can range from 0 to 1. A lower value increases the AI’s likelihood of detecting faces (but may misidentify), whereas a higher value is stricter (may miss faces). 0.5 is a balanced value that detects most faces while minimizing false positives.
Face Landmarker Model
Chooses a model for detecting facial landmarks (such as eye, nose, and mouth positions). Landmarks are used to align faces and ensure accurate swapping. 2dfan4 is a good model for most scenarios.
Tips: The default model works well. If the alignment is off, try different models.
Face Landmarker Score
Sets the confidence threshold for landmark detection, ranging from 0 to 1. A lower value makes detection easier; a higher value is stricter.
0.5 is a balanced value, ensuring accurate landmark detection without excessive errors.
Tips: If landmark detection fails (e.g., misaligned face), lower to 0.3; if there are false positives, increase to 0.7.
Options
keep-temp: This command saves temporary files (such as intermediate files created during processing) for debugging purposes.
Skip-audio: Removes audio from videos and only processes visuals, speeding up the task.
Tips: To save time, enable skip-audio when processing videos and audio is unnecessary.
Step 3: Face Swap
Now, let’s try FaceFusion for face swapping. To swap faces, you need to upload both the source and target files. Then, click the “Start” button to face swap.
And now I’ll show you the differences when you select different processors and face mask types. (Of course, other settings will remain default)
Source and Target:
| Processors | Face Swap Results |
| face_swapper (box face mask) |  |
| face_swapper + face_enhancer (box face mask) | 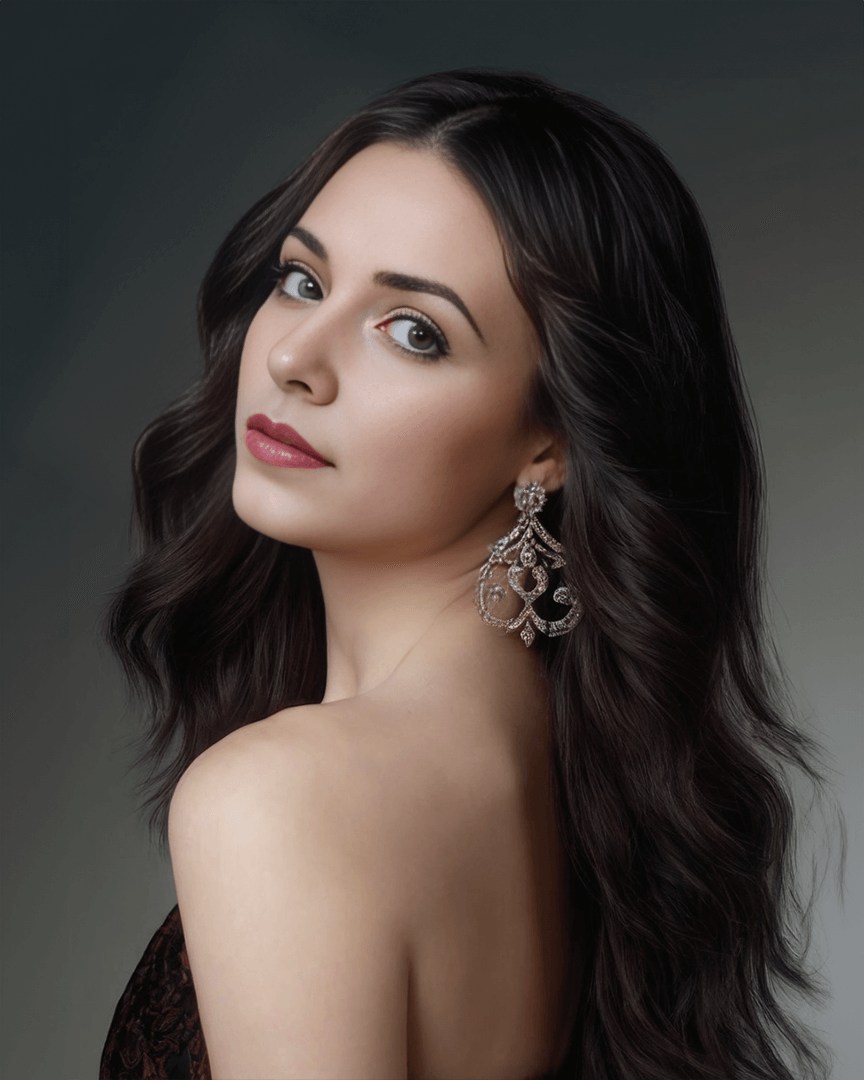 |
| face_swapper + face_enhancer + deep_swapper (box face mask) |  |
| Face Mask Types | Face Swap Results |
| Box (face_swapper + face_enhancer) | |
| Occlusion (face_swapper + face_enhancer) |  |
| Region, not select eyes (face_swapper + face_enhancer) | 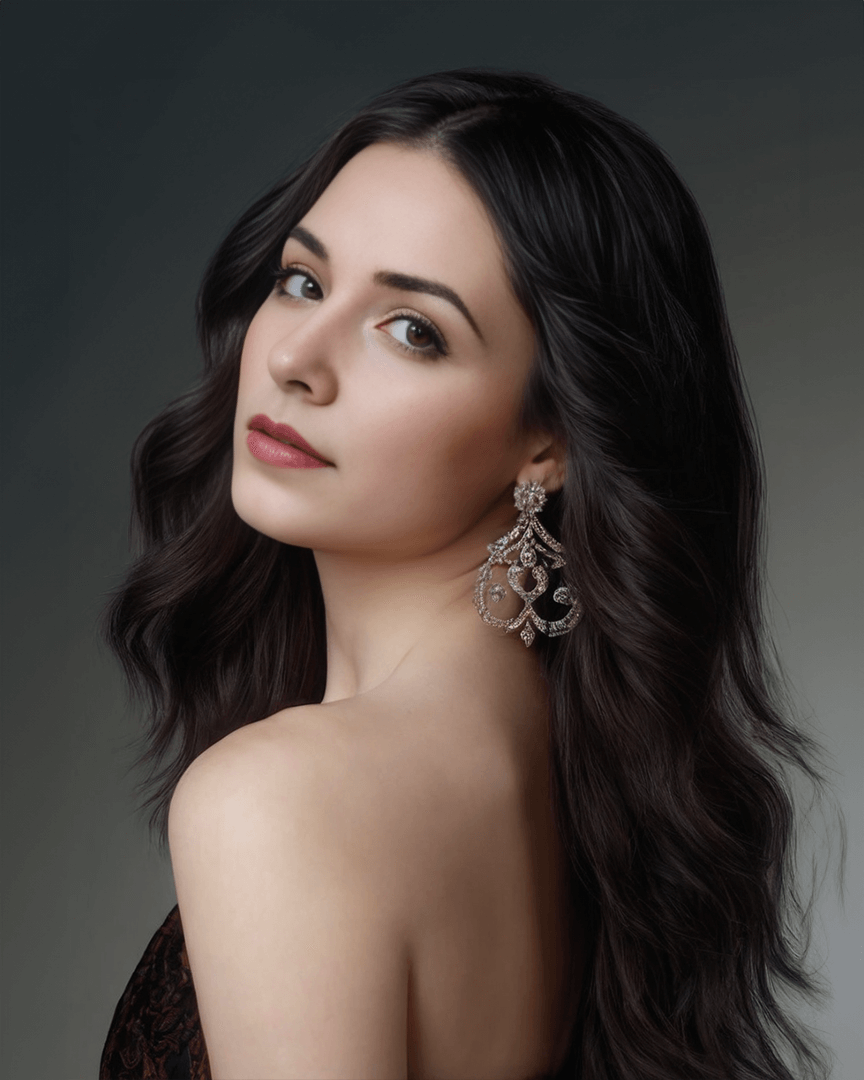 |
FAQs about FaceFusion Face Swapping
Is FaceFusion Really Free for Video Face Swapping?
Yes, FaceFusion is a free open-source software that allows you to swap faces in photos and videos. FaceFusion also allows for live face swapping. Also, because it runs locally, it is more private and secure than online services. However, if you have a bad GPU or only have the CPU to perform it, you will have to wait a long time for the face swapping results.
Why I Couldn’t Run FaceFusion on Pinokio?
FaceFusion requires the download of several resources, including model files. Some of these files may fail to download properly due to network or server issues. As a result, FaceFusion may fail to start.
When this occurs, you will typically receive error messages stating which files failed to download or validate. If you’re not sure how to fix it, you can ask ChatGPT or go online for help.
In most cases, the issue arises from missing or corrupted model files. Fortunately, FaceFusion is programmed to automatically download any missing models the next time you use it. If a model is corrupted (e.g., hash validation fails), simply remove the faulty file and restart FaceFusion; it will attempt to download the model again.
Does FaceFusion Support Group Face Swap?
Yes and No. FaceFusion does not directly support group face swapping in one go. However, you can choose which face in a photo or video to swap. So, if your media has several faces, you can use the face swap multiple times — once for each face — to create a group face swap.
How to Close FaceFusion Filter?
FaceFusion has a mature content filter to avoid uploading adult videos or photos. Want to close it? You can follow these steps.
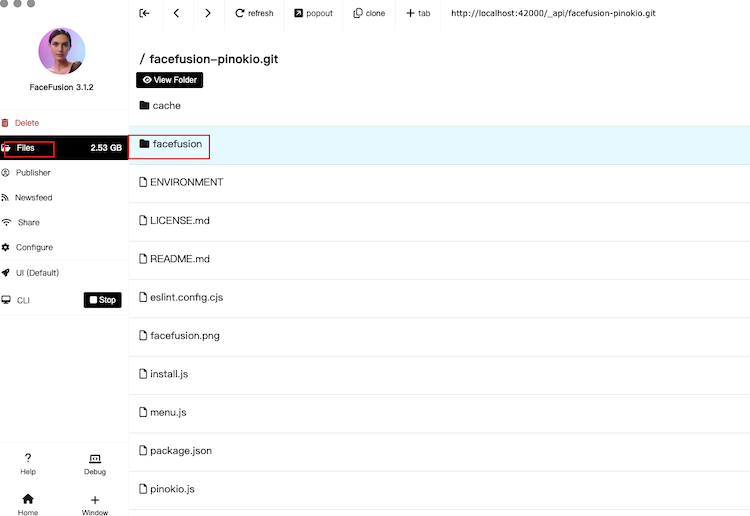
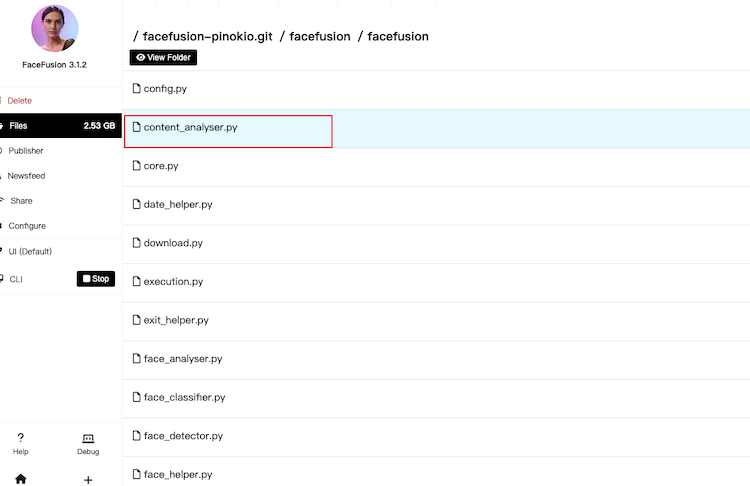
Step 1: files/facefusion/facefusion/content_analyser.py
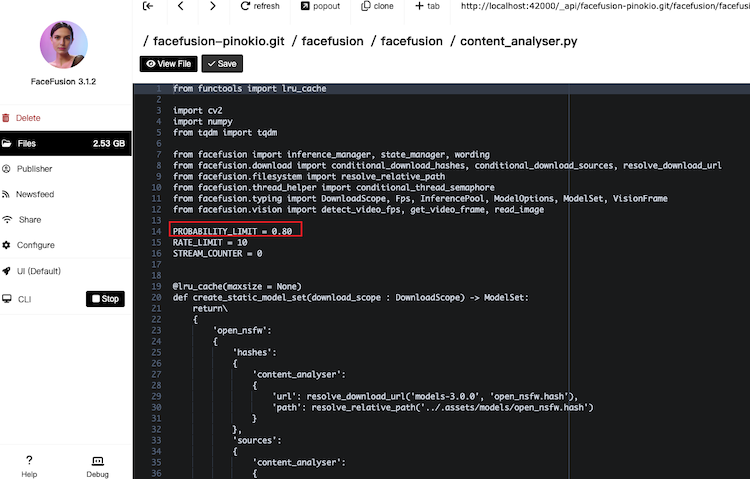
Step 2: Find PROBABILITY_LIMIT and change it from 0.80 to 1.00, then save it.
Summary
I’m happy to say that anyone can install and use FaceFusion without any coding knowledge. This detailed guide is suitable for anyone looking to explore completely free face swap photos and videos. I hope this guide is useful to you. Enjoy it.


Leave a Reply